How to See What's Taking Up Space on Your Mac (No Terminal Needed)
How to See What’s Taking Up Space on Your Mac (No Terminal Needed)
You type “what’s taking up space on my Mac” into Google.
And the first halfway decent answer you find is this:
sudo du -sh /* | sort -hrA command. With sudo. To find out where your own files are.
Look, I’ve typed that command plenty of times and it works. But there’s something nobody says out loud about it, and it’s that it doesn’t answer your question.
It hands you a column of numbers. Forty lines of text with folder names and a figure next to each one. So you pick the biggest one, scan it again, pick the biggest one inside that, scan it again, and fifteen minutes later you’re seven levels deep in a hidden folder wondering whether com.apple.mobilesync is safe to delete or whether you’re about to break your Mac.
It’s not that Terminal is hard.
It’s that a list is not a map. And what you need is a map.
The three things macOS offers you, and why all three fall short
First, let’s be fair to Apple. There are tools that don’t involve Terminal. It’s just that none of them finish the job.
1. System Settings → General → Storage.
It shows you a nice colored bar. Applications, Photos, Documents, Messages… and one giant gray block called System Data that takes up a third of the bar and can’t be opened.
It’s a diagnosis with the important part blacked out.
2. Sorting by size in Finder.
You go to your home folder, switch to list view, click the Size column.
And that’s where you find the detail that ruins the whole method: Finder doesn’t add up folder contents. Where the number should be, it gives you two dashes. --. A folder with 80 GB inside it and an empty folder look exactly the same.
3. Cmd+I, one folder at a time.
This one actually works. You select a folder, hit Cmd+I, and macOS starts calculating the real size.
The problem is you have to do it one by one, waiting each time, and your Mac has a few thousand folders. There are people who have spent an entire afternoon doing this. I’ve been those people.
What you actually want to see
Think for a second about how your head works when you walk into a messy room.
You don’t read a list of objects sorted by volume. You look. And in half a second you know the problem is the couch in the middle of the floor, not the socks.
Your disk would work the same way, if anybody let you look at it.
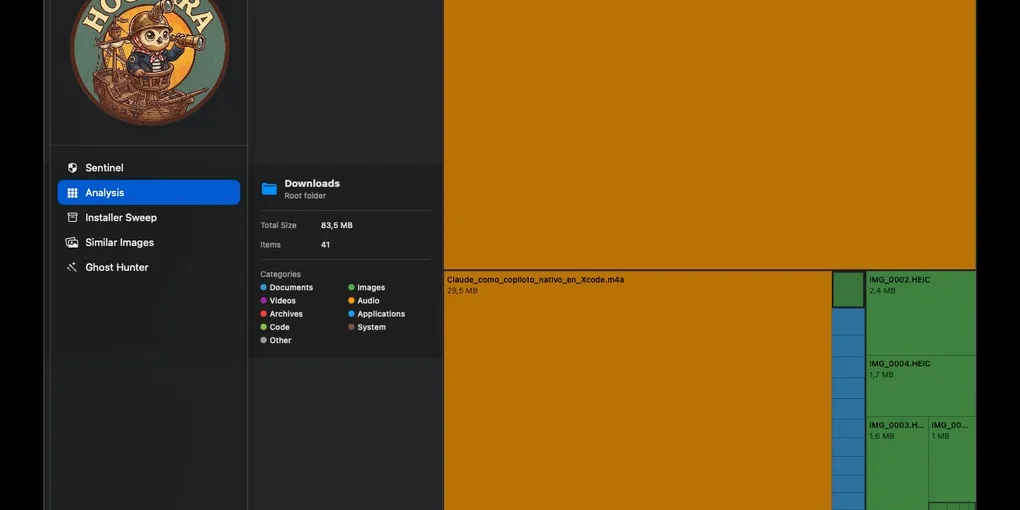
That’s exactly what a treemap does: every file and every folder gets drawn as a rectangle, and the rectangle is as big as what it actually takes up on disk.
And here’s the trick, which is the whole point of this article:
The big stuff can’t hide.
That 60 GB Docker.raw doesn’t show up on line 34 of a list you’re never going to read. It takes up 60 GB of your screen. It’s the biggest rectangle there is. You see it before you finish reading this sentence — and you see it without knowing it existed, without looking for it, without typing a single character into a terminal.
How to do it, step by step, in thirty seconds
With Hootara:
- Open the app and go to Analysis.
- Hit ⌘O and pick your home folder. Or just drag a folder onto the window. Whichever feels easier.
- Wait for the scan to finish. You can watch the file count climb, and if you get bored you cancel it.
- Look.
What comes out is your entire disk, drawn, with up to eight levels of depth at once. You don’t have to open folders to see what’s inside folders: the small rectangles are drawn inside the big ones. The hierarchy shows itself.
Colors are by file type — video, images, documents, archives, code, applications — so sometimes the diagnosis arrives before the name does. One huge purple blob means your problem is video. Analysis over.
Click any rectangle and the panel on the left tells you what it is: name, type, exact size, category, and the relative path, which is precisely the piece of information Terminal gives you and you can’t read.
And then there’s a button: Reveal in Finder.
That button is honestly my favorite part of the app. Because Hootara doesn’t delete anything for you on this screen. It takes you to the file, in Finder, and you decide there. ⌘↑ moves you up to the parent folder, and ⌘R rescans once you’ve cleaned up, so you can see the room you just freed.
No commands. No sudo. No deleting a folder blind when you can’t even say what it is.
What you’re going to find, almost guaranteed
In case you want to place a bet before you look. The fat rectangles are usually these:
- A backup of an iPhone you don’t own anymore. 60, 80 GB. The undisputed champion.
- Your Downloads folder. Four years of
.dmgfiles you installed and never threw away. - Duplicate photos and videos, normally sitting in three places at once.
- An app you uninstalled that left its 6 GB support folder completely intact.
- If you code:
DerivedData, the iOS simulators, theDocker.rawthat never shrinks, and fourteennode_modulesfrom projects you finished long ago.
Not one of these is visible in Finder. Every one of them is visible on the map.
One honest heads-up, because I’d rather be the one to give it to you: Hootara is on the Mac App Store, and that means sandbox. The first time, it’ll ask permission to read your home folder with a system panel, because without that permission macOS won’t let it into ~/Library. And it doesn’t go into /System, and neither should any app you install.
What you see is yours. What gets deleted, you choose.
That’s all.
Download Hootara on the Mac App Store →
P.S.: run the smell test before you install anything. Go to Finder, open your home folder, list view, sort by size. Count how many dashes are sitting where a number should be. There it is, in one second: the reason you’ve spent months not knowing what’s on your own disk.